Custom Hugo Shortcodes
Janne Kemppainen |Even though you can add normal HTML markup to your Markdown files in Hugo it doesn’t always mean that you should. Complicated or reusable pieces of code should preferably be abstracted away from the content. Custom shortcodes can help with this issue as they let you define snippets that can be added to the page and configured with parameters.
In this series we haven’t created the home page yet so in this post we are finally going to create a simple one with the help of some custom shortcodes.
The default Markdown library was changed in Hugo version v0.60.0 and if you have inline HTML in your Markdown files you may need to enable the unsafe mode in config.toml.
[markup]
    [markup.goldmark]
        [markup.goldmark.renderer]
            unsafe = true
Index layout
Typically themes have some sort of a ready homepage so that it is easy to just start using it. However, it might not look the way you’d like so you would need to reimplement it anyway. For now we have had really simple dummy content on the front page.
The index page template has put the content from the content/_index.md file to this kind of structure with Bulma classes:
<div class="container">
    <div class="section">
        <div class="content">
            {{ .Content }}
        </div>
    </div>
</div>
Everything in the _index.md file has been so far put inside this one container. Let’s change the behavior so that we can define the whole page from the Markdown file. This will give us a clean canvas to work with. The navigation bar and the footer are of course automatically included.
Change the layouts/index.html file to look like this
{{ define "main" }}
{{ .Content }}
{{ end }}
Now everything is added as is. Notice that if you have added text to the index page it will be rendered from edge to edge because the container was removed from the template.
Hero element
Before defining any custom shortcodes let’s add some pure HTML to the content/_index.md file to add a hero image with some text at the top of the page. Assuming that you have your hero image stored as static/images/blog/2019/water.jpg you could add the following code snippet:
<style>
.main-image {
    background-position: center;
    background-size: cover;
    background-image: url(/images/blog/2019/water.jpg);
}
</style>
<section class="hero is-large is-dark main-image">
    <div class="hero-body">
        <div class="container has-text-centered">
            <h2 class="title is-1">Are you ready?</h2>
        </div>
    </div>
</section>
This will define a Bulma hero element with large size and dark background. The custom main-image CSS class sets the background image and positions it to cover the hero element centered.
The hero-body element is where the hero text is defined. You could also add a hero-head or hero-foot element to position content at the top or at the bottom. You can read more about the hero element from the Bulma documentation.
Sections
Now, let’s create our first custom shortcode. As I already mentioned any text written on the Markdown file will be rendered from edge to edge because it is not inside a proper container. We could just write the content with normal HTML but there is of course a smarter way with shortcodes.
Create a file to layouts/shortcodes/section.html, you’ll need to create the shortcodes directory if it doesn’t already exist.
The shortcode definition should be as follows:
<section class="section">
    <div class="container">
        <div class="content">
        {{ .Inner | markdownify }}
        </div>
    </div>
</section>
The section class divides the page into sections that have some vertical spacing between them. The container class centers the content horizontally. And, as we’ve learned before, the content will render the plain HTML properly as the Markdown processor doesn’t add the Bulma classes that would be otherwise required.
The most important part of the file is naturally the {{ .Inner | markdownify }} line. It takes all content between the starting and the ending shortcode tag and runs it thorugh the Markdown processor.
Now the shortcode can be used in the _index.md file this way:
{{< section >}}
## Some title

My paragraph.
{{< /section >}}
The generated HTML looks like this:
<section class="section">
    <div class="container">
        <div class="content">
            <h2 id="some-title">Some title</h2>
            <p>My paragraph.
        </div>
    </div>
</section>
Notice that the content inside the section shortcode doesn’t need to be Markdown but you can also use HTML or other shortcodes! For example, you could wrap the youtube shortcode to give the video player some spacing:
{{< section >}}
{{< youtube U4UtpDaw8wY >}}
{{< /section >}}
List blog posts
Shortcodes can be a lot more complex internally and they can also take arguments. The principles of custom shortcodes are quite well documented in the Hugo docs.
Let’s create a parameterized shortcode to display a list of blog posts. Create a file to layouts/shortcodes/blogposts.html with this piece of code in it:
{{ $count := .Get "count" | default 6 }}
{{ $pages := where .Site.RegularPages "Type" "in" site.Params.mainSections }}

<section class="section">
    <div class="container">
        <h2 class="title has-text-centered">Blog</h2>
        <div class="columns is-multiline">
            {{ range first $count $pages }}
            <div class="column is-one-third">
                {{ partial "widgets/post-card.html" . }}
            </div>
            {{ end }}
        </div>
    </div>
</section>
The first line defines a parameter called “count” with a default value of six. This can be given as a named parameter when using the shortcode.
The next line gets a list of relevant pages from the site. It is especially important for themes to use the site.Params.mainSections for the type comparison instead of hard coded values such as “blog” or “post” so that the theme users can use any URL format that they like. If the config value hasn’t been set it will default to the section with the most pages.
The rest of the code creates a new section with a three column grid of blog post cards. Notice that partials can be use normally in shortcodes too. Here I’m using the post card partial that we defined in the list page post.
Now adding the blog posts to the front page is as simple as using the sortcode:
{{< blogposts count=6 >}}Sample page
The image below is an example of how the front page could now look. I’ve added some Lorem Ipsum text inside the custom section shortcode with a list and quotes to show you that they work normally. The embedded YouTube video is also inside a section.
The bottom part shows how the blog post shortcode renders.
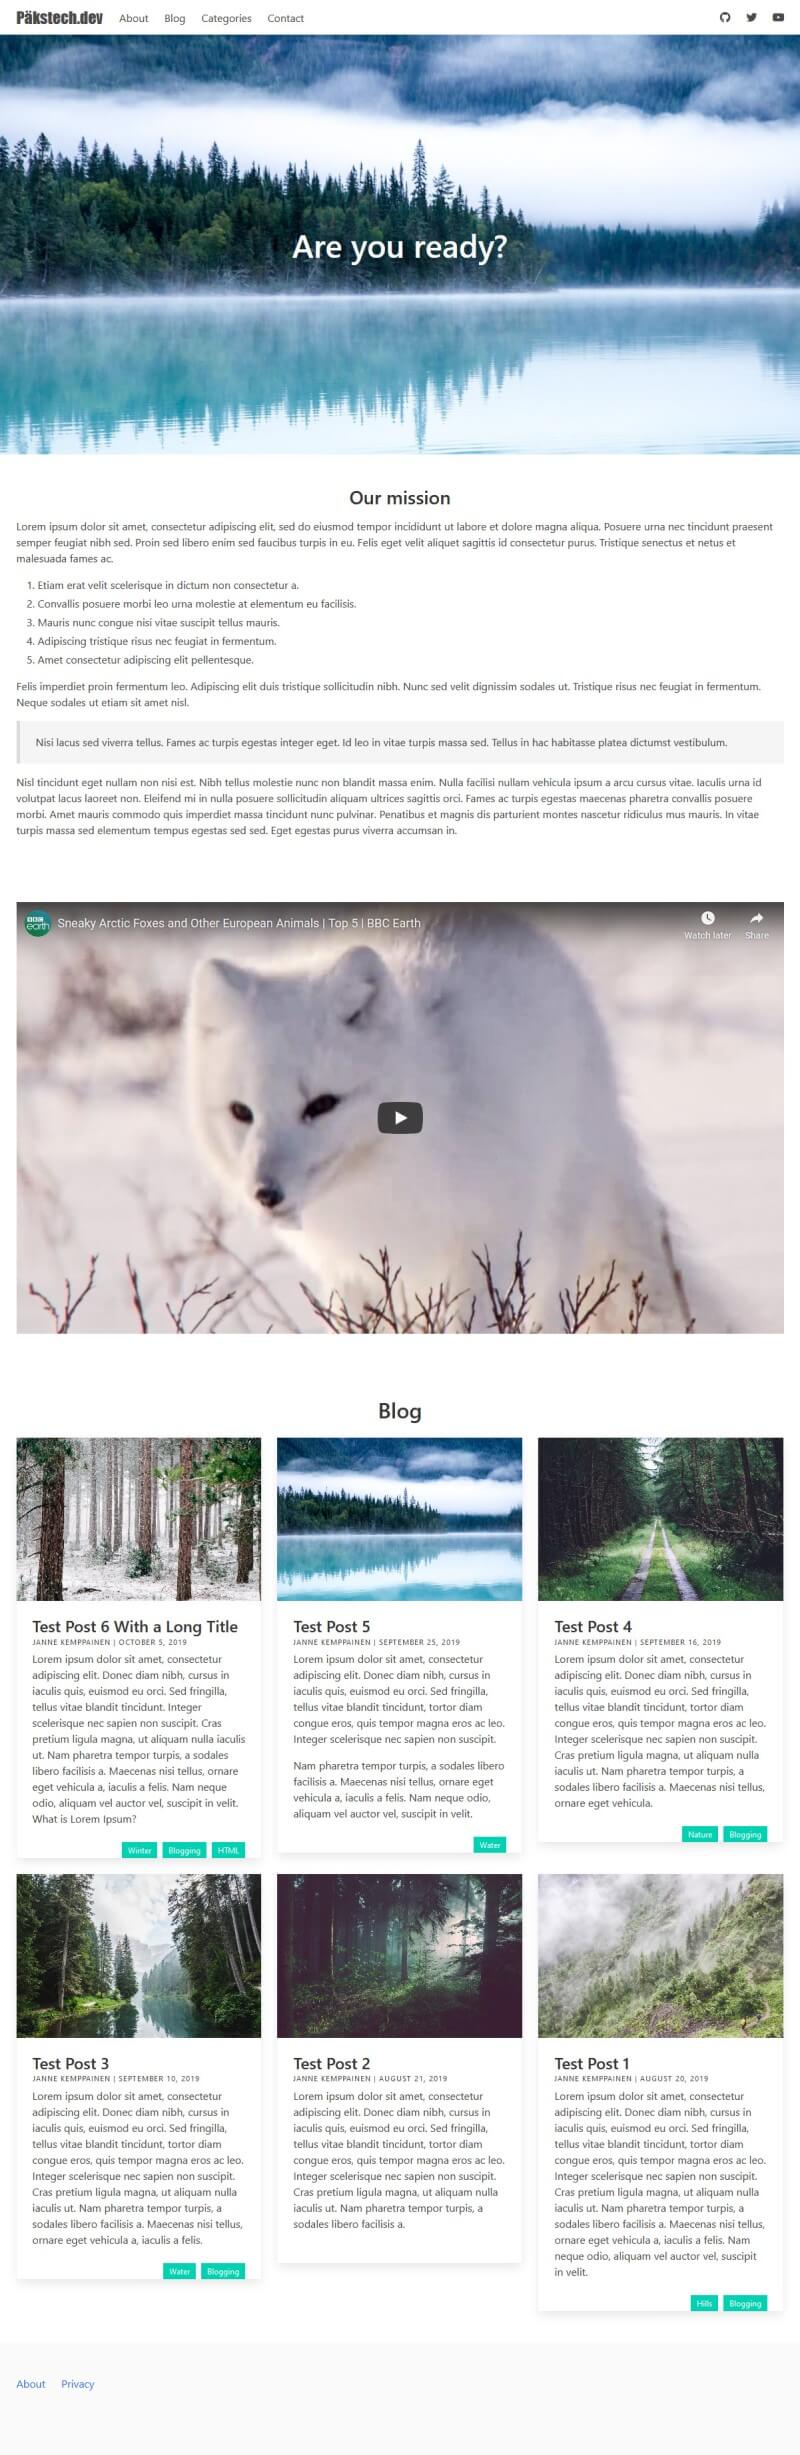
Sample frontpage
Conclusion
Now you should know how to create custom shortcodes with Hugo. I recommend that you read through the Create Your Own Shortcodes page from the Hugo docs as they have detailed explanations and examples there.
Share your own useful shortcodes down in the comments!
Read next in the Blog with Hugo series.
My Blogging Workflow with Hugo
Use Google Analytics to Show Popular Content on Your Static Blog
Previous post
Use Make to Power Up Your Python DevelopmentNext post
Publish Your Blog to Netlify