Dockerize Your Python Applications (Flask example)
Janne Kemppainen |Nowadays Docker containers seem to be all around us. With the rise of Kubernetes they are now even more relevant in businesses that choose to run their processes in public or private clouds.
Another trending thing in the development world is Python which is especially huge in the machine learning field. In this post I’ll show you how to containerize your Python application in just a few minutes.
Our example application will be a web page where you can upload an image which will then be scaled down and downloaded back to your computer. The sample project is written with Flask but you should be able to adapt this to other projects also. And as a bonus this post turned out to be a small tutorial on Flask too!
The Python project
A Python project consists of basically two major pieces
- the dependencies
- the code that binds those dependencies together
The dependencies are typically managed by defining them in a requirements.txt file and then installing with pip. During local development you should usually be using a virtual environment.
The main part, your own code, typically resides in its own module. Let’s create such project so that we can then later containerize it. This will be a simple Flask application but your application doesn’t necessarily need to be a web app in order to be containerized.
Create a new directory called thumbnailer under the root directory of your project. This is where we will put all the application code.
Also create a file called requirements.txt with the following content:
Flask
gunicorn
Pillow
Then create a new virtual environment with
>> python3 -m venv venvActivate the environment with (Mac/Linux):
>> . venv/bin/activateor (Windows PowerShell) with:
>> .\venv\Scripts\Activate.ps1Now install the requirements
>> python3 -m pip install requirements.txtPage template
The HTML side of the application is really simple as you can see from the template below. The file is located in thumbnailer/templates/index.html.
<!DOCTYPE html>
<html lang="en">
<head>
    <meta charset="UTF-8">
    <meta name="viewport" content="width=device-width, initial-scale=1.0">
    <meta http-equiv="X-UA-Compatible" content="ie=edge">
    <link rel="stylesheet" href="{{ url_for('static', filename='style.css') }}">
    <title>Image thumbnailer</title>
</head>
<body>
    <h1>Thumbnailer</h1>
    <p>This service will resize your image to {{ width }} x {{ height }} pixels</p>
    <form method=post enctype=multipart/form-data>
        <input type=file name=file>
        <input type=submit value=Resize>
    </form>
    {% for message in get_flashed_messages() %}
        <p>{{ message }}</p>
    {% endfor %}
</body>
</html>
It is mostly just plain HTML but there are some weird looking pieces there inside curly braces. These come from Jinja templating, and they are a way for us to show results from the Python code directly on the website.
In the head section there is a stylesheet link where the url is fetched with templating. It references a stylesheet in a static directory which we will define later on.
The {{ width }} and {{ height }} blocks replace those spots with values which are provided to the render function.
The for loop is how you display flashed messages with Flask. The get_flashed_messages() call returns a list of messages that were defined in the application code with the flash() function. These are then dynamically added to the page.
The page body contains a heading, a short description and a form for selecting and uploading an image to be processed. The form will create a POST request to the application with the selected image file which then needs to be processed and returned back to the user.
Application code
And here is the application code. The file is located in thumbnailer/main.py and all of the logic is contained in this one file.
import os

from flask import Flask, flash, request, redirect, render_template, send_file
from io import BytesIO

from PIL import Image

SECRET_KEY = os.environ.get("SECRET_KEY", "notsosecret")
IMAGE_WIDTH = int(os.environ.get("IMAGE_WIDTH", "300"))
IMAGE_HEIGHT = int(os.environ.get("IMAGE_HEIGHT", "300"))

app = Flask(__name__)
app.secret_key = SECRET_KEY


@app.route("/", methods=["GET", "POST"])
def image_resize():
    if request.method == "POST":
        if not is_valid_file():
            flash("Invalid file!")
            return redirect(request.url)
        return resize_image()

    else:
        return render_template("index.html", width=IMAGE_WIDTH, height=IMAGE_HEIGHT)


def is_valid_file():
    if "file" not in request.files:
        return False
    f = get_file()
    if not f or not f.filename:
        return False
    return is_image(f.filename)


def get_file():
    return request.files["file"]


def is_image(filename):
    ext = os.path.splitext(filename)[1].lower()
    return ext in [".jpg", ".jpeg"]


def resize_image():
    f = get_file()
    image = Image.open(BytesIO(f.read()))
    image.thumbnail((IMAGE_WIDTH, IMAGE_HEIGHT))
    buffer = BytesIO()
    image.save(buffer, "JPEG", quality=80)
    buffer.seek(0)
    return send_file(
        buffer, mimetype=f.mimetype, as_attachment=True, attachment_filename=f.filename
    )
The secret key is required for the flash() function to work and the value can be given from the environment. There is also a not so secret default value if the environment variable hasn’t been set. Flask uses this secret to encrypt session data so that it can’t be tampered with. For more information check this question on Stack Overflow.
After the environment variable definitions there is the application initialization. This is the object that eventually handles routing of the requests.
After that we have our only route definition which points at the root. It has two allowed methods, GET and POST and the application decides what to do based on the method value in the request. In the case of a POST request the code checks whether the request contained a valid image file or not. If a JPEG image was not attached to the request an error message will be flashed to the user, otherwise the image will be resized and sent back to the user.
With a GET request the code will simply render the index.html template that we defined earlier. This contains the form that creates the POST requests.
The resize_image() method reads the received image contents to a BytesIO stream and then passes it to the Pillow imaging library. The size of the image object is then reduced with the thumbnail() method. Note that this modifies the image object in place instead of returning a new image.
A new BytesIO object works as a buffer for the outgoing image and it is given to the image save method. After saving the image the buffer has to be rewinded back to the beginning for the send_file() function which ultimately sends the file back to the user.
The first parameter for send_file is the buffer with the image data. MIME type is a label which identifies the type of the data sent, here we just copy back what we received with the original file. The as_attachment parameter makes the browser open the download prompt instead of directing to and showing the file, and the attachment_filename specifies download filename. Again, we are using the name of the original file.
And that is all of the code that we need.
CSS styling
If you run the code without any styles you should see that while functional it doesn’t look that good. Here I have added some styles as an attempt to make it a bit prettier. The file is located inside the Python package as static/style.css which is the path with which we identified it in the index.html file.
body, html {
    height: 100%;
    margin: 0;
    padding: 0;
    background: #36D1DC;
    background: -webkit-linear-gradient(to right, #5B86E5, #36D1DC);
    background: linear-gradient(to right, #5B86E5, #36D1DC);
    font-family: 'Courier New', Courier, monospace;
}

main {
    display: flex;
    justify-content: center;
    align-items: center;
    height: 100%;
}

.app {
    background: white;
    padding: 1em;
    padding-bottom: 2em;
    border-radius: 20px;
    text-align: center;
    box-shadow: 0 4px 8px 0 rgba(0, 0, 0, 0.2), 0 6px 20px 0 rgba(0, 0, 0, 0.19);
}
I’ll quickly explain what these styles do.
The body and html elements are stretched to the full height of the available space in order for the gradient background to look good. The margin and padding values remove any unneeded space in and around these elements which could cause scroll bars to appear.
The background has three defintions that maximize support across browser versions. The browser will select the last one that it supports so the first value is a fallback for old browsers. The font family is also set to a monospace font.
The main block is defined as a flex container with display: flex. Its content is centered both horizontally and vertically with the justify-content and align-items properties. The height: 100% makes sure that all space will be occupied and whatever element inside the block will therefore be on the center of the page.
The app div is then a definition of the actual controls. The white background makes it stand from the page gradient and the padding gives some headroom for the text and input elements. Border radius gives those rounded corners, text is aligned centered, and a small box shadow gives some depth.
Running the application
To run the Flask development server first we need to set some environment variables. On Mac and Linux export these values:
>> export FLASK_APP=thumbnailer.main:app
>> export FLASK_ENV=development
If you are using Windows PowerShell the commands are:
>> $env:FLASK_APP = "thumbnailer.main:app"
>> $env:FLASK_ENV = "development"
The FLASK_APP variable is the path to the file where our main Flask application is located and the part after the colon if the name of the application instance variable in the main.py file.
Now the development server can be started with:
>> flask runIf the above command doesn’t work you can try this one instead:
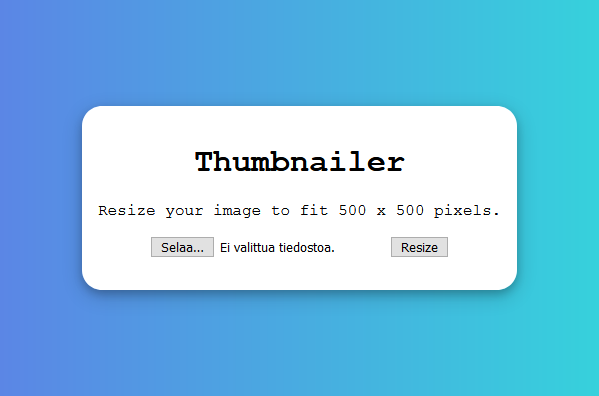
>> python3 -m flask runNow if you go to http://localhost:5000 you should see the application in action! It should look like this:
Dockerfile
The basis of all Docker containers is a file called Dockerfile which describes what the final image should contain.
The idea is that you start from a simple base image, then add only the dependencies that are required by your application, and finally include your own application code. The aim is to keep the resulting image relatively small.
On the development side we were using the Flask development server which is not recommended for production. Therefore for the Docker image we will be switching to a proper WSGI HTTP server called Gunicorn.
The whole Dockerfile can be as simple as this:
FROM python:3.8-slim

COPY ./requirements.txt /tmp/requirements.txt

RUN pip install -r /tmp/requirements.txt

COPY ./thumbnailer/ /thumbnailer

CMD ["gunicorn", "-w", "2", "-b", ":8080", "thumbnailer.main:app"]
The FROM definition starts from the slim version of Python 3.8. Then the COPY directive copies the requirements file from the project to a temporary directory on the container. The requirements file contains Flask, Gunicorn and Pillow which are installed on the next step with pip.
Then our custom application code is copied over to the container to its own directory. Finally, the CMD definition sets the command that is executed when the container starts. The parts of the command that would normally be separated by whitespace must here be in a list of strings.
The command starts with gunicorn which is the WSGI server that runs our flask application. It became available as a command line command with the installation from pip. The -w parameter sets the number of worker processes to two and -b binds the application to port 8080 on the container. The final parameter is the path to the app in our code.
You could also use this image as an alternative starting point for your Dockerfile. I do recommend that you check out the repository if you’re going to require a really performant Flask installation.
Running the Docker image
Now that the Dockerfile has been defined we will first need to build the image. Just use this command:
>> docker build -t "thumbnailer" .The -t parameter for docker build defines the tag of the new image. This is what we will reference to when starting the container. Don’t also forget that you need to have the dot at the end of the command. It will set the current directory as the build context. Docker will then look for a Dockerfile and start going through the steps defined in it.
After a successful build you can create a new container with this command:
docker run -d --name thumbnailer -p 8080:8080 -e IMAGE_WIDTH=500 -e IMAGE_HEIGHT=500 thumbnailerThe -d flag makes the new container start on the background (detached). The name parameter gives a friendly name to the container instance, otherwise Docker would generate a random one. Then -p binds the port 8080 on the local machine to the port 8080 on the container. This is the same port that we exposed on the Gunicorn command.
The -e options set environment variables which are optional and can be omitted. We defined default values that will be used if they are missing. Remember that you can also set the SECRET_KEY environment variable if you like. The final parameter is the tag of the image that we just built.
After running the command you should now be able to go to http://localhost:8080 and see that the application works just like it did before.
You can use docker ps to check the running containers:
>> docker ps
CONTAINER ID        IMAGE               COMMAND                  CREATED             STATUS              PORTS                    NAMES
26846fda6ccb        thumbnailer         "gunicorn -w 2 -b :8…"   47 hours ago        Up 33 minutes       0.0.0.0:8080->8080/tcp   thumbnailer
To stop and remove the container you can do the following:
>> docker stop thumbnailer
>> docker rm thumbnailer
>> docker rmi thumbnailer
The first command stops the running container. The second one removes the container instance that was named “thumbnailer”. The third command removes the container image that we built.
Conclusion
So that was a small combination of some Flask development with Dockerizing a Python application. Adapting the Dockerfile to other Python applications shouldn’t be that difficult. You should basically just replace the files that you want to copy over to the image and maybe change the command to python ....
Did you find this tutorial useful? If so I’d like to hear about in the comments. Also if you have a topic in mind that you would like to learn more about share them down below and maybe I will write something up if I know enough about the subject. Until next time!
Previous post
Create Diagrams That Look Like Hand-drawn