How to Develop With Windows Subsystem for Linux?
Janne Kemppainen |Normally I’m writing this blog on a Mac but today I needed to use my Windows desktop PC instead. This meant that I needed to set up my environment properly with Visual Studio Code, Git, Hugo etc. In this post I’ll show you how to do development using the Windows Subsystem for Linux (WSL).
My use case is to run the Hugo development server and Git on WSL but to edit the source files with the native Visual Studio Code application. Another use case could be doing Node.js development with WSL.
All the command line commands should be run in the Ubuntu terminal.
If you already have WSL installed you can jump straight to the Hugo instructions or Node.js instructions
What is Windows Subsystem for Linux?
For those of you that don’t know Windows Subsystem for Linux is a kernel interface that “translates” commands from the Linux kernel to work on a Windows machine. It lets you install a Linux user space such as Ubuntu and run a shell with the most common commands (bash, git, python3, etc.) and install other software with the package manager.
Since it is not a real Linux kernel there are some things that wont work such as device drivers or applications that require kernel services that haven’t been implemented. It’s not meant to run in production environments (that’s what virtual machines are for) but works great without the hassle of managing virtualization.
Installation
Installing the Ubuntu subsystem is quite straight forward. Here is a step-by-step guide:
Open the Start menu and start typing “Windows features” and select “Turn Windows features on or off”.
Tick the checkbox for “Windows Subsystem for Linux” and click OK, reboot when prompted
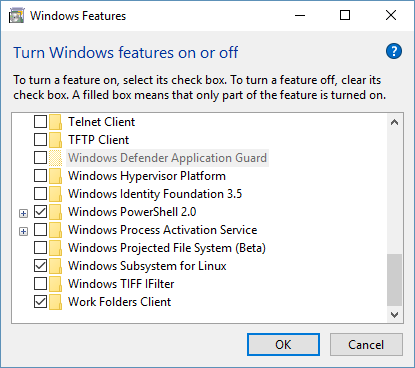
Windows Subsystem for Linux enabled
After rebooting search for Microsoft Store on the Start menu, search for Ubuntu and install it
Search for Ubuntu on the Start menu and hit enter, the Ubuntu terminal window should now open and the installation should be finalised
Next the installation will ask you to set up a username and password. These can be anything you like and they don’t need to be the same that you use on Windows.
That is all you need to install WSL. You can start multiple instances of the Ubuntu terminal if you want.
Hugo Development with Subsystem for Linux
To start developing with WSL the first thing you’ll need is of course the software that you’ll do the development on such as Hugo or Node.js. You can install them using the package manager apt. For example to install Hugo use the command
>> sudo apt install hugoNext you will need to navigate to a directory that is also available on the Windows side. When you open a new Ubuntu terminal window the home directory will be inside the Linux subsystem and these files shouldn’t be modified from the outside because it can cause serious problems to the Linux installation.
Luckily you can access all Windows files through the /mnt directory which mounts all Windows drives. You can check all available drives by listing the contents of /mnt.
>> ls /mnt
c  d  f  g  j  k  q
The number of letters listed here naturally depends on the amount of drives that you have on your own machine. I’m going to use the f drive for development purposes.
Navigate to the drive and directory that you want to use (create directories if necessary). Here is what I’m using:
>> mkdir /mnt/f/Päkstech
>> cd /mnt/f/Päkstech
If you already have your Hugo project stored remotely on GitHub or Gitlab just use git clone to fetch the repository from the remote server. If you want to create a new Hugo site check out this post to get started.
Navigate to the project directory and start the Hugo development server:
>> cd pakstech
>> hugo server --disableFastRender -D
This will start the development server at http://localhost:1313 and you can access it using your web browser normally. The WSL is therefore using the same network interface as Windows so you can access things as if they were running on the Windows side.
If you now open the File Explorer on Windows you should be able to navigate to the directory that you created on WSL. For example my project is found under F:\Päkstech\pakstech\.
This directory works normally under Windows so now you can use Visual Studio Code to edit the files. If you have the Hugo server running in the background on WSL it will detect any file changes, rebuild the site and refresh the browser. In other words it works exactly like you’d expect.
Node development with Subsystem for Linux
The second example is for doing Node.js development with WSL. We will create a React app under the Linux subsystem.
Node installation
Start by installing the Node Version Manager:
>> curl -o- https://raw.githubusercontent.com/creationix/nvm/v0.34.0/install.sh | bashYou can find out what the current version is from the NVM GitHub repository.
Close and reopen the Ubuntu terminal to finish the installation.
Now we should have the nvm command available. Install the latest stable release of Node:
>> nvm install stableCheck that the installation works:
>> node --version
v11.13.0
Create the app
Create and navigate to a directory that is accessible from Windows. As mentioned earlier these are under the /mnt directory. For example:
>> mkdir /mnt/f/Päkstech
>> cd /mnt/f/Päkstech
Next create the React application:
>> npx create-react-app my-appIt will take some time for npx to download and extract all the required files so wait patiently. Navigate to the project directory:
>> cd my-appFinally, start the web app:
>> npm startThe React sample app should open on your browser at http://localhost:3000. The project files can be edited from the Windows side, for example in my case F:\Päkstech\my-app.
Make the Ubuntu terminal work on Visual Studio Code
It is nice to have the terminal available on the Visual Studio Code window. First open your project folder with VS Code. To set the terminal you need to go to the preferences so open File > Preferences > Settings to get to the editor settings.
Type terminal.integrated.shell.windows in the search bar and replace the path to powershell with the Bash executable path C:\WINDOWS\sysnative\bash.exe. See the image below.
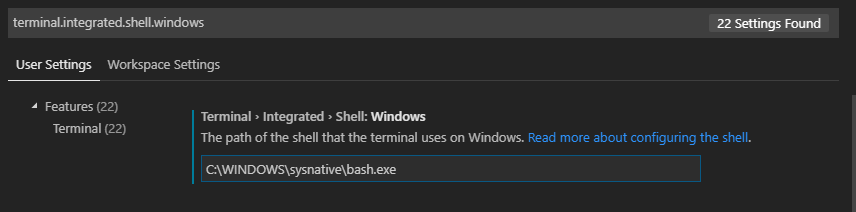
Setting Bash as the terminal on Windows on VS Code
You can now close the settings tab. Click Terminal > New Terminal to open a new terminal and you should now be greeted with Bash running inside of VS Code. What’s cool is that VS Code correctly sets the current directory to the Windows mount.
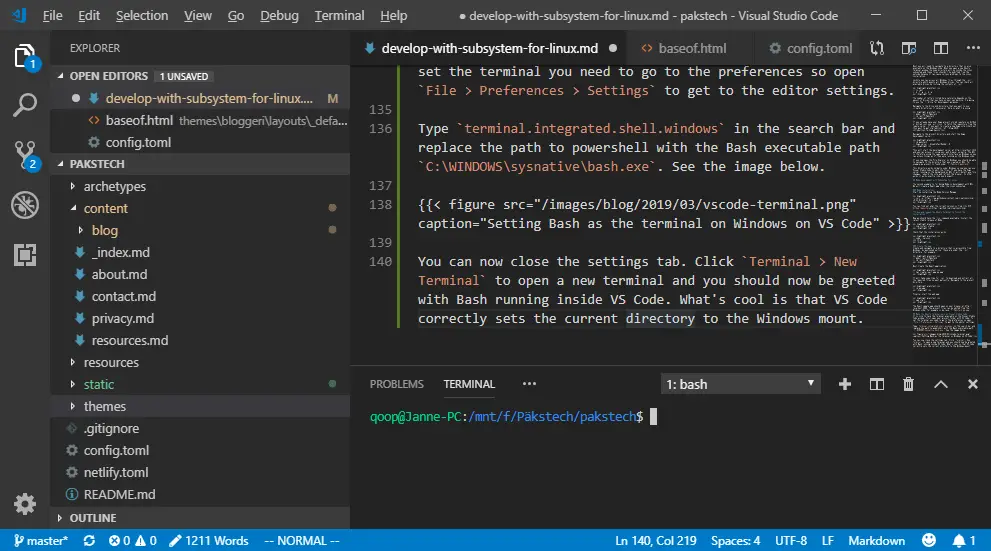
Bash terminal running on VS Code
Now you can for example run hugo server in a place that is highly visible and quickly catch build errors when they occurr.
At first I had problems with copying and pasting to the Ubuntu terminal as the terminal options didn’t have the tick box which should enable Ctrl+Shift+C/V for copy/paste available. After manually checking for Windows updates I managed to get a version that had that option available.
To enable copying and pasting type bash in the start menu and hit enter to open a new terminal window. Right click the top bar of the window and select Properties > Options. Check the option “Use Ctrl+Shif+C/V as Copy/Paste” and click OK. Now you should be able to paste text to the terminal even in VS Code with Ctrl+Shift+V.
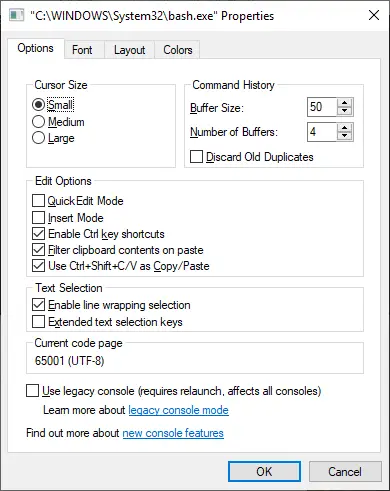
Use terminal properties to enable copy/paste
Conclusion
Now you should be able to build your Hugo site or a Node.js application with Windows using the Subsystem for Linux and edit the project files with VS Code. I hope you have found this tutorial useful!
Discuss on Twitter
I set up my #Hugo blogging environment with Windows Subsystem for Linux and Visual Studio Code. Here is a blog post about it with a bonus setup for #React development https://t.co/ToJld15bpC #wsl #vscode
— Janne Kemppainen (@pakstech) April 1, 2019
Previous post
Create a Single Post Template in Hugo