Control a Samsung TV with Node-RED
Or, How to Make Your Girlfriend Mad
Janne Kemppainen |Node-RED is such a versatile thing. Did you know that it can be even used to control a TV! Wouldn’t it be nice to be able to restrict viewing time or force the TV to shut down on school nights? In theory you could even create your own remote controller.
In this post I’ll show some examples that could inspire you to create your own flows. Even though the control nodes I am using are specific to Samsung TV’s you should be able to adapt these designs to other manufacturer’s models too.
Even if you don’t really want to manage your TV programmatically you should still learn how to actually create some (potentially) useful logic with Node-RED.
Note that my TV is from year 2016 so the library I’m using might or might not support your model.
Requirements
Here are the prerequisites to get started with this project:
- Node-RED up and running (installation instructions for Raspberry Pi here)
- Samsung TV (Tizen) connected to the local network
Check the IP address of your TV from the TV settings menu or from the connected devices list on your router.
You will also need to install a package that lets you add nodes for controlling the TV. In the Node-RED configuration view select the top right hamburger menu and navigate to Manage palette -> Install, search for the correct node and select install. I am using node-red-contrib-newsamsungtv.
If your TV is from some other manufacturer or this library doesn’t work for you here are some others for you to try out (I haven’t tested these):
- node-red-contrib-samsung-tv-mk for Samsung
- node-red-contrib-bravia for Sony
- node-red-contrib-lgtv for LG
Going forward I will be referring to the nodes from the node-red-contrib-newsamsungtv library. You’ll need to make the appropriate adjustments depending on the library that you are using.
Node descriptions
The controller library is quite simple as it contains only two nodes: “SamsungTV Command” and “Is Alive”.
The SamsungTV Command node is basically your remote controller. It contains all the possible keys that your remote controller would, and probably some more. Depending on the model not all of the key codes might work with your TV.
Configuring the node is really simple as there are only three options to be set:
- Name: The name of the node visible in the flow
- IP: The address of the TV that you want to control
- Command: The command you want to be sent when the node receives a message
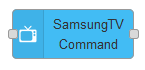
SamsungTV Command node
The “Is Alive” node is even simpler as it only contains the Name and IP parameters. It has one input for activating the check and two outputs, “No” and “Yes”, for enabling other nodes based on the result.
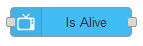
TV is alive check node
However, the is alive node doesn’t actually know whether the TV is on or off but it tells if the TV is available for receiving commands. In practice it can still be used as such because the TV will go to sleep shortly after being turned off.
Turning it off and on again
Perhaps the most basic need for this kind of programmatic control is to be able to turn the TV on or off. With the help of the command node and the KEY_POWER code it should be easy peasy, right?
Well, unfortunately it is not just that simple as the TV will not respond to the key events when it is hibernating. Which means that once the TV has been off for a small time it will stop responding and you won’t be able to turn it on with the SamsungTV Command node anymore.
Lucky for us, the Samsung smart TV’s support Wake-on-LAN, even over WiFi. Node-RED comes with a wake on lan node which is listed under the “network” group. We can use it to turn the TV on and it should work even if the TV is sleeping.
First you will have to find the MAC address of the TV. Here is how to do it on my device:
- Open settings and go to “Support”
- Select the option to contact Samsung
- Scroll down to see the MAC address
Add the wake on lan node to your flow and and connect it to a inject node so that you can trigger it. Double click the WoL node to open the configuration and type in the MAC address of the TV. In the second field you should put the boradcast address of your network. This is usually the same as your own IP address but the last part is 255. For example in my case it is 192.168.1.255. You can also give the node a friendly name such as “Samsung TV WoL”. Change the inject node to send boolean true.

Turn TV on with a WoL packet
The next flow is for toggling the TV power. I have named the node “KEY_POWER” which is the same value as the selected command. Don’t forget to set the IP address.
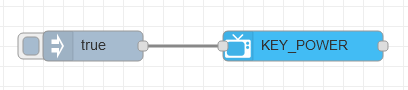
Turn TV on with a WoL packet
Try toggling the power a few times. You should see that it works for a while but if the TV is off for a longer time it wont turn on again.
So how could we create a toggle switch that works consistently? You can build something like I have in the image below.
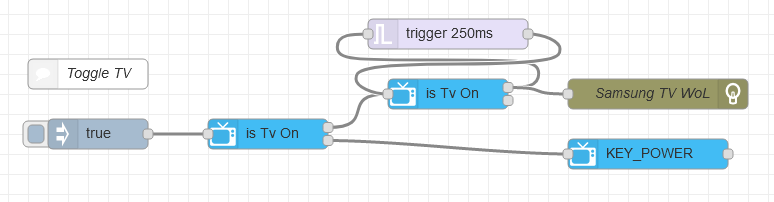
Node configuration for toggling TV on and off
The WoL and KEY_POWER nodes have the same configuration as before. The additions here are the “is alive” nodes and a delay trigger.
The input node is first connected to the node that checks whether the TV is available or not. The upper output sends “true” when the TV is off which in turn fires the WoL packet. The packets might not always get through so I added a loop that periodically checks whether the TV is on and sends packets until it responds.
If the first status check returns “On” then only the power switch key event is sent. This also works for a few seconds after shutting down the screen. If the power is toggled fast enough the WoL packets won’t be sent.
The configuration for the delay trigger is shown in the image below.
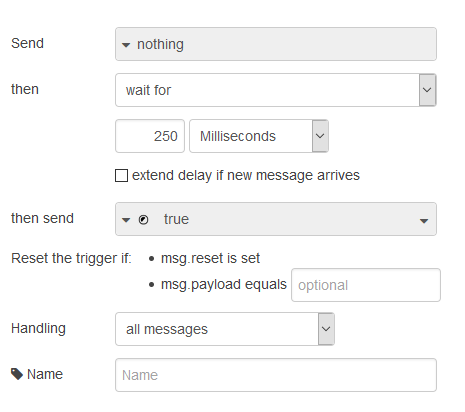
Delay trigger configuration
With this configuration toggling the state should work pretty much always. You could hook the input to something more interesting such as home automation or Apple HomeKit.
Early shutdown on school nights
This one might be good for you if you have kids that have to wake up early to get to school. They could have their own TV for games and watching Netflix but you don’t want them to stay awake late on school nights.
Instead of yelling every night to shut it down why not create an automated schedule that enforces it automatically!
The implementation is quite simple. You’ll need to install one more library called node-red-contrib-bigtimer. This contains the bigtimer node which lets you create schedules for sending messages.
Create the following flow with a bigtimer, switch, is alive node and a SamsungTV Command node. Use the middle output of the bigtimer node which will send a message every minute when the schedule is active.

Automatically shut down the TV during preset periods
Here is an example configuration for the bigtimer to ban watching between 10 p.m. and 4 a.m.
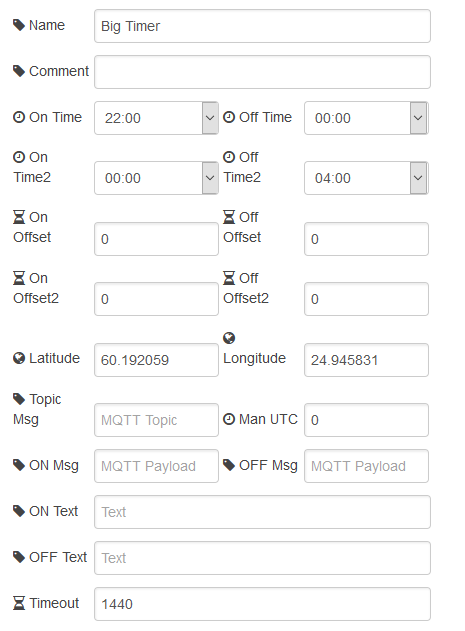
Timer configuration
At the bottom of the timer there are checkboxes where you can select when the timer is active. By selecting the days from Sunday to Thursday you’ll cover all the days of the week that can have school on the next day. This way it is possible to keep watching late on Fridays and Saturdays.
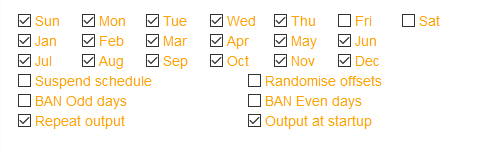
Timer active days
Next, configure the switch to check if the message payload is equal to the string “1”. This will convert the output from the bigtimer node to a boolean value as the middle output sends either “0” or “1”.
Timer active days
The rest of the flow is simple. If the result of the is alive check is “On” then the KEY_POWER event will be sent to the TV.
The timer sends a message every minute so while this flow doesn’t actually prevent the TV from being turned on again it is super annoying to have to turn it on every minute.
Be careful when experimenting with this as your significant other may not appreciate it when the TV starts to randomly go off while you’re away..
Log watch time
Another, less intrusive thing to do could be to log the time that the TV has been on. For this we’ll need some sort of a counter. Quick search to the Node-RED library selection reveals that there is indeed one that should work quite well for us: node-red-contrib-counter.
Counting time turned on
Go ahead and install the library as we learned earlier. The new counter node should appear in the “function” group. Add one counter object to your flow.
We can use the counter without any additional configuration as the defaults are just fine. The count starts from zero and is incremented by one for each incoming message. The total count is appended as msg.count to the original message object.
Before the counter we will naturally need to put the “is Tv On” node that we used earlier. Just copy and paste an existing one from your flow or configure a new one. Connect the bottom output (Yes) to the input of the counter.
Now we need to figure out a way to repeat the check every minute. You might be tempted to look for a library but such a simple thing can be actually accomplished with the built-in node inject.
Drag and drop a new inject node to the flow area and connect it to the “is Tv On” node. Change the inject payload type to boolean true. Change the repeat value to “interval every 1 minutes”. Check the tickbox “Inject once after 0.1 seconds” to make it start automatically!
Logging to file
Let’s choose the simple approach and log the watch time to a file. However, we don’t just want to store whatever value the counter contains but to collect the accumulated count once a day.
I couldn’t find a suitable node for keeping track of a value and forwarding it only when triggered with another message so I ended up writing a custom function for that purpose.
The Node-RED docs contain some instructions for writing functions so be sure to check it out if you don’t understand what I’m doing here.
Add a new function node and configure it with the following code (I’ll explain how it works) and set the number of outputs to two:
if(msg.count || msg.count === 0) {
    context.set('count', msg.count);
    return null;
}
if(msg.payload) {
    msgCount = {payload: context.get('count')};
    msgReset = {reset: true};
    return [msgCount, msgReset];
}
Nodes can store and retrieve data from different contexts (flow, context and global). Here I am using context which is the node’s local context and not available to other nodes. The context has methods for setting and getting stored values.
The counter node will add the current count to the message object. In the custom function we check if the message contains the count attribute and then set the ‘count’ key in the context with the value. Note that we need to check the zero case explicitly because otherwise it would evaluate to false.
Returning null will exit the function without sending any messages and stops the execution. This is important because we don’t want to log every message to the file, only when we explicitly trigger the logging.
The second part of the node checks if the message payload is “truthy” and in that case constructs two messages for the outputs. The first message contains the current count as payload and the second one has the reset attribute set to true. This is the format that the counter accepts for resetting the count.
Now, add another inject node and configure it to send boolean true and set it to repeat at a specific time. Set the time to 00:00 to make it trigger once every midnight.
Finally, add the file output node and configure it with a friendly filename such as tv-log.txt. This file will be stored under the home directory of the user that Node-RED was configured with (probably pi if you’re using a Raspberry Pi).
Connect the nodes together like this:
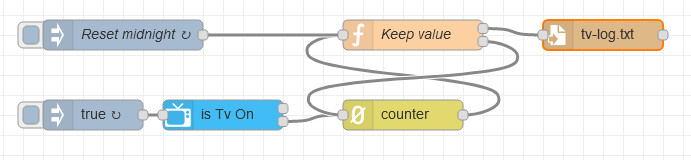
Flow for logging TV on time
To recap the flow goes like this:
- Trigger “is TV On” check every minute
- Increment counter each time the TV was on
- Keep track of the latest count in the custom function
- Trigger reset every midnight and store the current count in the log file
- Reset the counter which will also set the custom function count to zero
This flow could be simplified by implementing the counter inside the custom function. However, the counter node can be useful in other applications so it is good to know that it exists. I’ll leave the alternative implementation to you as homework.
Limit watch time
After logging the watch time the next logical step might be to limit watch time. You might already have an idea how to accomplish this. Here is my take on the problem.
Start by copying the nodes that count the time that the TV has been on as we can use them as is.
Now we need something to decide whether the count is too large or not. It might be easy to resort to the custom function node again but we can use the built in node switch which is used for routing messages based on their properties.
The way that we have configured the counter means that the output will have an additional property count alongside the normal payload property which will already be boolean true from the power check node. Edit the switch node to check for the msg.count property, set the comparison to greater than or equal (>=), change the type to number, and give your desired threshold value in minutes, e.g. 180 for a three hour limit per day.
Connect the output of the switch to a KEY_POWER node. Now when the count exceeds the limit threshold the power key will be triggered every minute if the TV is on. Note that we don’t have to repeat the power check node because the counter is already triggered only if the TV is on.
The final thing to do is to reset the counter every day. Copy the “Reset midgnight” node from the previous example. You can change the reset time to some other value such as some time during the night.
Add one more switch node and connect it with the reset node. Configure it to set msg.reset to boolean true. Finally connect the switch output to the counter. The copmlete flow should now look like this:
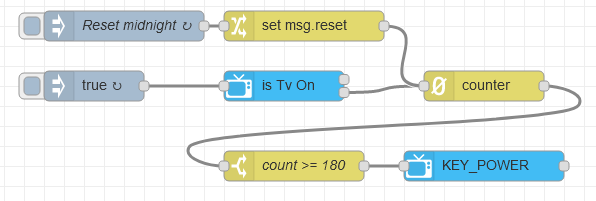
Flow for limiting TV watch time
After deploying the flow you can enjoy the joy of limited TV watch time and make everyone in your household very angry!
You can test that the whole thing actually works by clicking the button next to the repeating “true” node multiple times until your threshold has been reached. The TV should now turn off automatically every minute.
Conclusion
Hopefully this post gave you some concrete ideas on how to make your Raspberry Pi communicate with a TV. You’ll probably want to implement a way to circumvent these limitations for the occasions that you actually want to keep on watching.
I’d like to hear if you were able to follow these instructions and connect with your TV. Tips for other manufacturers are welcome too.
Comment down below if you’d like to see some other use case documented here and maybe I’ll edit them in! See you on the next post!
Discuss on Twitter
Control the TV with Node-RED to prevent late watching on school nights, or to annoy your girlfriend.https://t.co/REMdAcqbSg
— Janne Kemppainen (@pakstech) October 2, 2019
Previous post
Getting Started With Node-RED On a Raspberry PiNext post
Browse the Web With a Keyboard