Backup Files with Duplicacy
Janne Kemppainen |File backups can be difficult to do properly. I postponed setting up a backup solution for so long but now that I have a local file server all ready and set up I finally took the time and figured it out. After all I don’t want to lose all my precious images to a hard drive failure.
These instructions are for Windows. You will need to adapt some parts if you want to do the same for another OS.
My previous way of backing up images was to manually copy them to a USB drive that was attached to my home router and shared over the local network. It was better than nothing but required manual work and it was easy to forget to copy any new files over to the backup drive.
I searched for different alternative backup software solutions and found out that there are quite many to choose from. After trying out a couple of tools I finally chose to go with Duplicacy.
While not being free and open source software in the strict manner the CLI version of Duplicacy is free for personal use and the source code is available on the Duplicacy GitHub repository. Generally, people seemed to be happy with it and that’s why I chose to go with it.
Duplicacy makes use of file deduplication which can save lots of space if you have many duplicate files. If you’re backing up multiple computers to the same storage then the space savings can be really substantial.
In simple terms Duplicacy takes your files and splits them into smaller chunks. Each chunk is stored in a path that depends on its hash. The contents of each snapshot is stored on a file that points to the correct chunks. For more details check the Duplicacy design notes.
If you want to use the GUI version or you want to use the application commercially then you need to buy a license. With the GUI version you get a fancy interface to manage your backups but if you are happy with the command line then the CLI version should be enough.
Duplicacy supports many cloud storage backends such as:
- Dropbox
- Amazon S3
- Google Cloud Platform
- Backblaze
- Wasabi
In this post we will set up backups with an SFTP server. The target machine is the openmediavault installation that I set up in earlier post.
Installation
With the free CLI version there isn’t much to do with installation. Go to the releases page and download the latest release, then extract the executable wherever you want and it is usable on the command line if you define the full path.
However, having to specify the full path to the executable can be tedious. Rename the file to duplicacy.exe and follow these instructions to add the Duplicacy CLI to your path:
Create a directory where you want to store the executables, for example I’m using
G:\executablesand copy theduplicacy.exefile therePress the Windows key, search for “Edit the system environment variables” and hit enter
Click
Environment Variablesin the System Properties window
Under the
System variablessection choosePathand click edit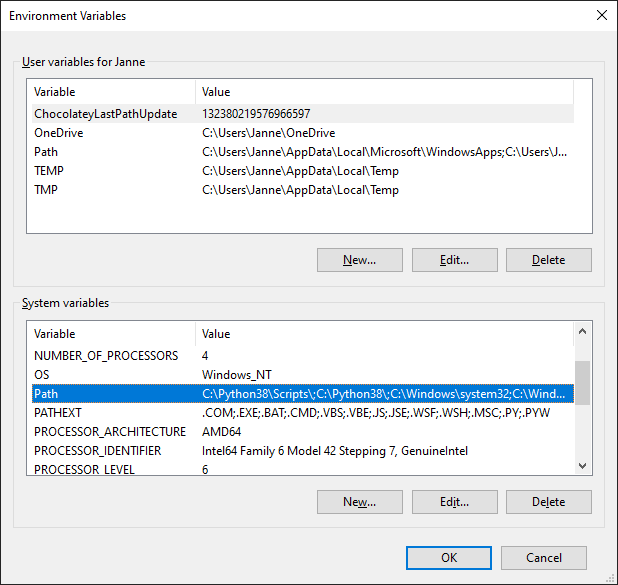
Click
Newto add a new entry and either write the path to the directory that contains the executable files, or use the browse feature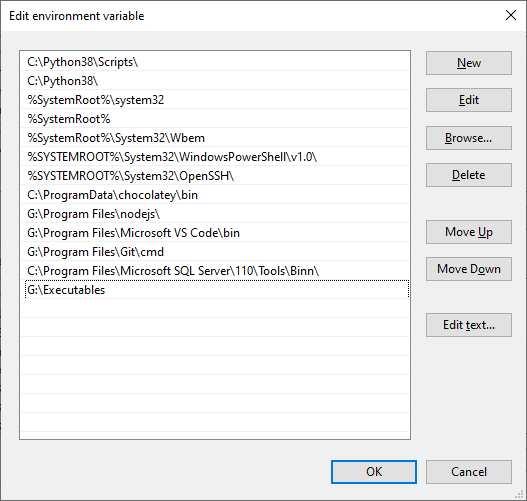
If you now open a new terminal window you should be able to call the program without the full path like this:
>> duplicacy
If you see the Duplicacy usage info printed on the screen you performed the installation correctly!
First backup
To back up a directory you need to first open a command prompt there and initialize Duplicacy with the name of the repository and the storage backend. So first navigate to the directory that you want to backup (I’m backing up a directory in J:\vault).
>> J:
>> cd vault
Then run the initialization command, for SFTP it would look something like this:
>> duplicacy init vault sftp://[email protected]/srv/dev-disk-by-label-storage/vault
The first parameter after init is the name of the backup on the server. The second argument is the connection string.
The connection definition starts with the sftp:// protocol followed by the user account and server address. If you’re usind openmediavault like I am make sure that you have added that user to the SSH group so that the connection can be made.
The path after the server address depends on how your server is configured. For openmediavault the share location is of the format /srv/dev-disk-by-label-<storage name>/<path to share>. So in my example the name of the storage device is storage and the share path is vault.
When you hit enter you’ll be asked for the account password.
Now you can start the backup process with
>> duplicacy backup -stats
Depending on the amount of data that you are backing up the process can take from a few seconds to many hours. If you interrupt the execution you can run the command again and it will continue from where it left off.
After the backup has been successful you can check the revisions
>> duplicacy list
Data restoration
An equally important part to having the backups is being able to recover them. They say that you don’t have backups until you have tried to recover them.
The restoration process is quite simple, essentially just running these commands:
>> cd /some/other/directory
>> duplicacy init vault sftp://[email protected]/srv/dev-disk-by-label-storage/vault
>> duplicacy list
>> duplicacy restore -r <revision>
With the first command we navigate to another directory. There we need to use the same initialization command that we used for the actual backup. Next, the available revisions can be listed with the duplicacy list command and the files recovered with whe duplicacy restore command where the -r parameter takes the revision number that you want to fetch.
Run on schedule
Running backup jobs only when you happen to remember them is not a great idea. However, it is quite easy to automate the process with the built-in Task Scheduler in Windows.
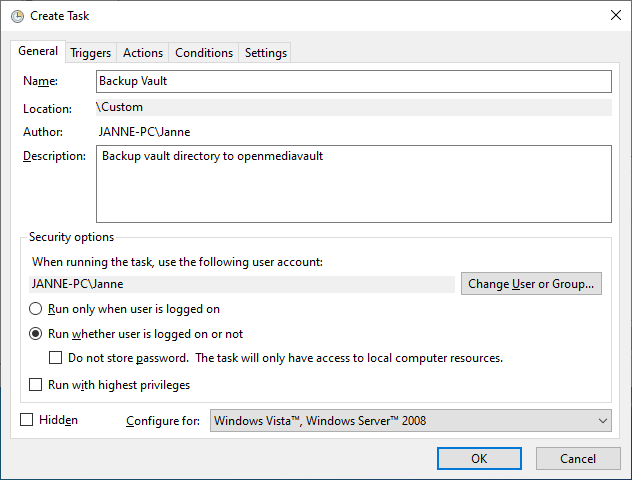
Open the Windows menu and search for “Task Scheduler”. You can create a new folder under the Task Scheduler Library to keep your custom tasks neatly in one place. Then click Create Task... on the right hand Actions panel.
Give a name and description for the job on the General tab. Also choose the “Run whether user is logged on or not”. This way the job will run in the background and the command prompt will not pop up every time that the backup process needs to run.
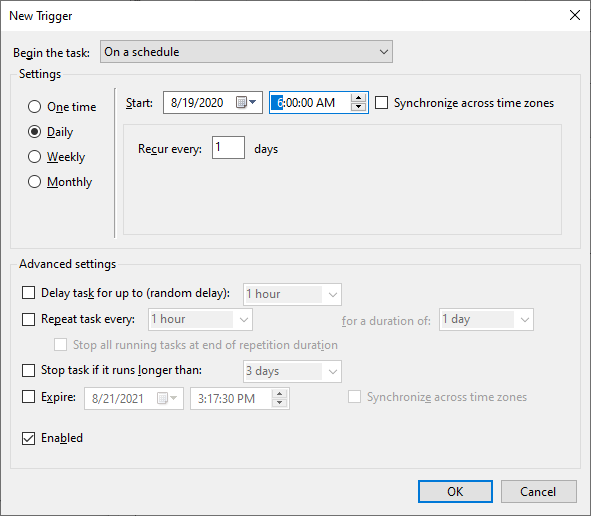
Switch to the Triggers tab and create a new trigger. Change the task schedule to your liking, for example once a week or every day, depending on how often you want to back up the files.
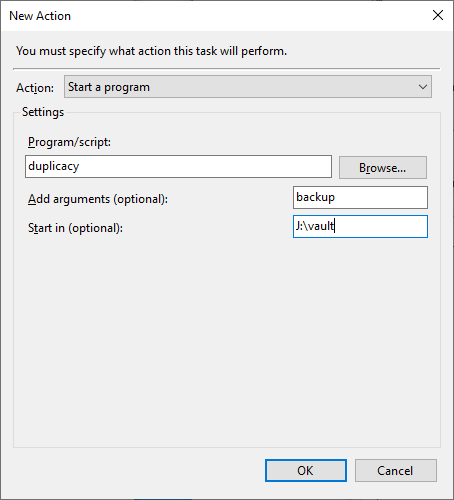
Then in the actions tab create a new action. This is where you need to set up the backup command. Set the Program/script to duplicacy, add backup as the argument and choose the directory where you ran the initialization in as the start location.
Keep the default settings on the Conditions tab and continue to Settings. There you need to check the “Run task as soon as possible after a scheduled start is missed” option. This makes sure that the backup job runs as soon as possible if your computer wasn’t turned on when the backup was supposed to start.

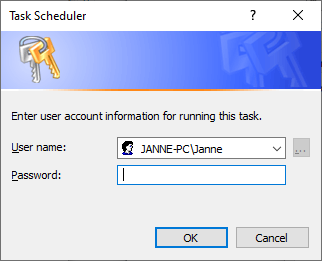
Click OK to accept the settings. The Task Scheduler will ask for account credentials as you set the job to run in the background. Choose the account that you want to use and provide the password.
You can test the job by selecting it and then clicking Run on the right. The task list can be refreshed with the F5 key and when you see that the task has been run successfully you can check that a new revision was created using the duplicacy list command.
Conclusion
If you followed these instructions you should now have quite solid backups for your files. You can share your comments, questions or improvements on Twitter or in the comments of the embedded video. See you in the next post!
Previous post
Gentle Introduction to GitHub Actions