Send Teams Notifications from Azure DevOps
Janne Kemppainen |An important part of a CI pipeline is to keep you updated on what’s happening. When a build or a test suite fails you might want to be notified about it. In this post we’ll learn how to send messages to a Teams channel from an Azure DevOps pipeline.
Teams messages can be sent in the form of Adaptive Cards. It is a JSON format that can be used to create quite complex messages with different elements and styling options. In this post we’ll focus on plain text messages but I’ll show you how to start customizing the message content.
Configure a Teams webhook
The very first thing you need to do is to create a new webhook for your Teams channel for sending programmatic messages. The webhook is a special URL where you can send web requests to add new messages to the chat.
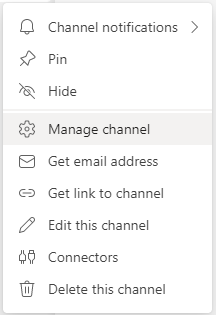
On Teams, hover over the channel name on the sidebar and click the three dots to open the channel context menu and choose “Connectors”.
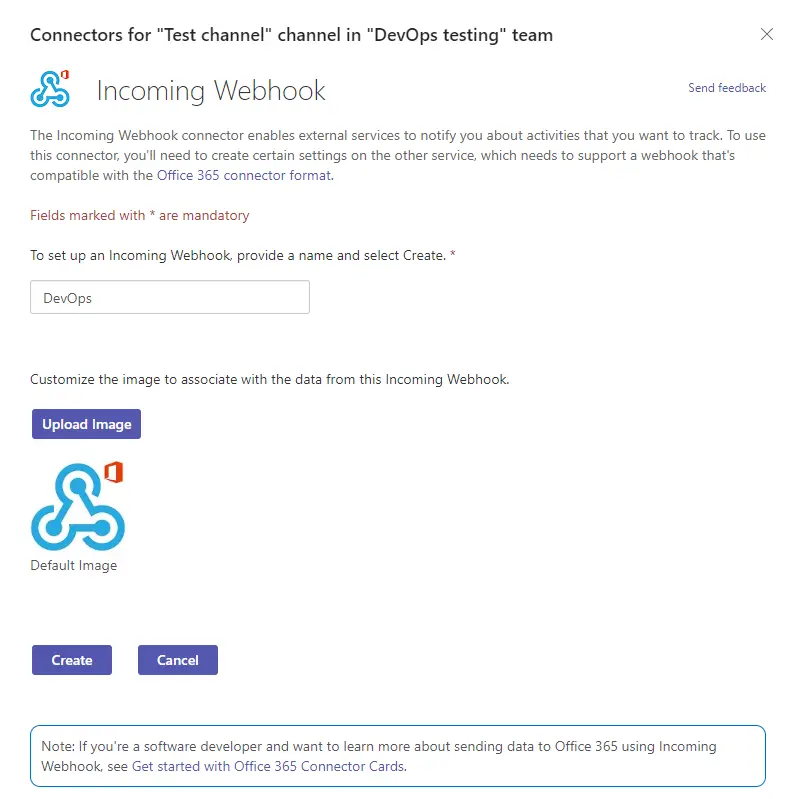
Click the configuration button next to Incoming Webhook.

Choose the name and image that you want to be shown on the messages and click Create.
Teams will give you the new webhook URL. Copy it somewhere where you can find it later. That URL is the only thing that is needed to send messages through the webhook, no additional authentication is used. Therefore, you shouldn’t probably expose it to outsiders unless you want to risk receiving spam messages (the webhook can’t read messages on the channel, so your conversations are safe anyway).
Azure DevOps template
Since you may want to send messages from many different pipelines and places it’s best to wrap the functionality in a template. Azure DevOps templates let you define reusable building blocks that can even be shared across repositories. I suggest you check the official documentation if you’re not familiar with them yet.
I’m just going to lay out the whole template first and then explain how it all works. If you’re not interested in the details you could just copy the template and start using it in your pipelines, the parameters should be descriptive enough. Though I do hope that you read until the end to get some tips for customization. Anyway, here’s the teamsMessage.yaml template:
parameters:
  - name: webhookUrl
  - name: message
  - name: condition
    default: ''
  - name: displayName
    default: Post message to Teams

steps:
  - bash: |
      curl -v -X POST ${{ parameters.webhookUrl }} \
        -H 'Content-Type: application/json; charset=utf-8' \
        --data-binary @- << EOF
        {
          "type":"message",
          "attachments":[
            {
              "contentType":"application/vnd.microsoft.card.adaptive",
              "contentUrl":null,
              "content":{
                "$schema":"http://adaptivecards.io/schemas/adaptive-card.json",
                "type":"AdaptiveCard",
                "version":"1.2",
                "body":[
                  {
                    "type": "TextBlock",
                    "text": "${{ parameters.message }}"
                  }
                ]
              }
            }
          ]
        }
      EOF
    displayName: ${{ parameters.displayName }}
    ${{ if parameters.condition }}:
      condition: ${{ parameters.condition }}
The template has two required and two optional parameters:
webhookUrlshould be set to the URL that you created in Teams,messageis the text that you want to send,conditionis an optional argument that controls if the message should be sent or not, anddisplayNamelets you optionally customize the name of the send message step on Azure DevOps.
The command itself if basically one curl invocation that sends a POST request to the webhook URL. It uses some Bash magic to read the JSON content until an EOF is encountered. This way we don’t need to escape the newline characters, making the payload easier to edit.
The message parameter is placed inside a TextBlock element in the card definition. Note that since the value is placed as is you need to make sure to escape any characters that could break the JSON formatting.
The message format that Teams accepts is very specific. You have to send a “message” type object with the Adaptive Card as an attachment, but also the attachment itself needs to be an object with contentType, contentUrl and content fields. Your card design needs to be placed inside the attachment content field!
You can use the Adaptive Cards Designer to preview how the message would look.
{
    "$schema":"http://adaptivecards.io/schemas/adaptive-card.json",
    "type":"AdaptiveCard",
    "version":"1.2",
    "body":[
        {
            "type": "TextBlock",
            "text": "${{ parameters.message }}"
        }
    ]
 }
If you copy the above definition to the designer it should render properly.

The condition parameter is used, well, conditionally. This is actually a nice way to define conditions in templates when the step execution decision must happen during runtime. In the next section you’ll find some examples of how it can be used.
Using the template
Now we just need to call the template with our own parameters. Templates that are defined in the same repository can be accessed in pipelines by using relative paths from the current file.
This sample pipeline below shows how you can send different messages depending on if the pipeline has been successful or not.
pool:
  vmImage: "ubuntu-latest"

trigger: none

steps:
  # insert your own steps here
  - template: teamsMessage.yaml
    parameters:
      message: |
        ✔ Pipeline was run successfully!
        [Results]($(System.TeamFoundationCollectionUri)$(System.TeamProject)/_build/results?buildId=$(Build.BuildId))
      webhookUrl: <your-webhook-url-here>
      condition: succeeded()
      displayName: Send success message
  - template: teamsMessage.yaml
    parameters:
      message: |
        ❗ Pipeline failed!
        [Results]($(System.TeamFoundationCollectionUri)$(System.TeamProject)/_build/results?buildId=$(Build.BuildId))
      webhookUrl: <your-webhook-url-here>
      condition: failed()
      displayName: Send failure message
Teams supports a limited set of Markdown formatting, so you can also include links ([description](url)) in your message. The strange combination of variables in the result links creates the URL for the pipeline run results using the built-in variables in Azure DevOps. This makes it easy to adapt to different projects.
Note that the condition is under the parameters section since it’s actually a parameter. The Azure Pipelines syntax does not support setting a common condition for the whole template. In this case the condition is just a simple succeeded() or failed() statement, but you could add a more complex condition and it would work equally well. For example, this condition would check that the pipeline has succeeded so far and that a variable called noRelease is not set to true:
condition: and(succeeded(), ne(variables['noRelease'], 'true'))
Again, you can find more information about conditions from the official documentation.
Custom cards
I already mentioned the Adaptive Cards Designer, and if you intend to create more complex cards it’s definitely a tool you should check out. As the complexity of your message increases you may want to move the logic to a separate service or a script as maintaining it inline the YAML pipeline can become a bit tedious.
However, if your pipeline already produces the needed variables in a nice format, then it should be quite straight forward to make the visualization a bit nicer by referencing those in the JSON structure.
When you develop the card in the designer just remember that you can’t send the JSON from there as is, it needs the supporting structure where the actual card has to be defined as the attachment content.
{
  "type":"message",
  "attachments":[
    {
      "contentType":"application/vnd.microsoft.card.adaptive",
      "contentUrl":null,
      "content":{
        <card-content-here>
      }
    }
  ]
}
This image is just for inspiration, but it shows what kind of things are achievable with a bit of work.
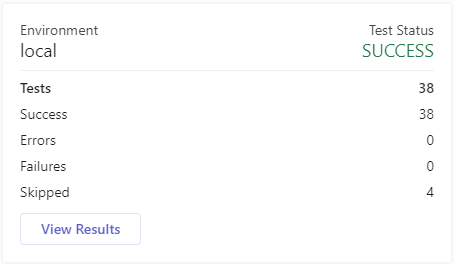
It is actually from a small Python API that I wrote for publishing xUnit formatted test results to a Teams channel. Implementing that in a reusable way with Azure Pipelines would’ve been a bit tedious so I decided to spin up a small service on a Kubernetes cluster that I had available instead.
Conclusion
Sending Teams notifications from Azure DevOps is not really difficult once you get the message payload correctly formatted. I hope this template serves you well in your projects!
Previous post
Configure a TLS Secret in Kubernetes