AWS Security Groups Explained
Janne Kemppainen |When you create an EC2 instance it can be added to up to five security groups. But what are they actually and how do they work?
Security groups can be thought of as collections of firewall rules that are applied at the VM instance level. They define rules that allow inbound or outbound connections to and from EC2 instances. Security groups can be found under the EC2 settings.
Security groups work at the instance level and only affect the instances where they have been specified. In contrast, network ACLs are similar but they work at the subnet level and automatically apply to all instances within a subnet. Network ACL would be the more traditional network firewall in this case.
Just like firewalls, security groups control the inbound and outbound traffic to your instances. By default, everything is denied, unless it is explicitly allowed. The rules themselves are always allow rules, you cannot create explicit deny rules.
Security groups are bound to network interfaces. If your VM has more than one network interface, each of them can belong to different groups.
The default security group
Each Virtual Private Cloud (VPC) has its own default security group. If you don’t define the security group when creating a new EC2 instance, the default group will be used automatically.
The default security group allows inter-communication between instances in the same group and outbound connections to anywhere. Inbound communication from the outside world needs to be configured manually. The default security group cannot be deleted but its rules can be edited.
Security groups are always regional, so each region also has its own default security group. This means that you cannot use the same group for instances in us-east-1 and eu-central-1, for example. Regions consist of Availability Zones (AZ) that are isolated locations, and security groups work across AZs in the same region.
Custom security groups
When you create a new security group, the initial configuration allows outbound connections to everywhere, but no inbound traffic. If your service needs to be accessible from the web then you have to configure inbound rules for each protocol and port that your application needs. The outbound rule can be removed or replaced with stricter rules as needed.
The most common protocols have ready templates so you don’t need to remember the network protocols and port numbers. Though, you can define custom protocols and port ranges if needed. Alternatively, you can use All traffic to accept all kinds of traffic.
The Source configuration is used to select where connections can be initiated from in inbound rules. The Custom selection lets you type the permitted IP address ranges in the CIDR notation format, for example 11.22.33.44/24.
The source can be a security group, too. It can be either the same group, or a different one. If you want to allow communication between VMs in the new group you’ll have to create the security group first before you can reference it in its own rules.
If you set the source to Anywhere, all IPv4 and IPv6 addresses will be allowed. You can also allow your own IP address easily with the My IP option. This could be useful for narrowing down SSH access.
Example: web server
Let’s say that your VM is running a web server, so it needs to allow traffic to the HTTP port 80 and HTTPS port 443. In theory you could configure the default security group to allow HTTP traffic, but that would also open it for other instances in the default group which wouldn’t be nice.
When you configure a new virtual machine on the AWS web console, the last step asks you to configure the security groups. By default, the configuration wizard creates a new security group and adds the SSH allow rule for all sources.
The easiest way to allow web server traffic is to click the Add rule button and choose the HTTP and HTTPS rules. Remember to rename the new security group since the default name launch-wizard-1 is not very descriptive!

Now when you create the VM it will belong to the newly created security group, maybe you named it web-server.
But soon you realize that you need to create another web server. In addition, your servers need to be able to communicate with each other through various ports.
When you create the second VM you can now choose the web-server security group to allow incoming web traffic. Since the instances need to be able to talk to each other you can also select the default VPC security group since it allows all communication within the group.

Now the second instance can accept web traffic too, but communication between the instances using non-HTTP ports doesn’t work! Why?
Only the second VM has been added to the default group, so now you need to go and include the first one too.
Since security groups are actually bound to the network interfaces the security group management is not obviously visible in the instance summary view. Click the correct instance on the EC2 Dashboard to open the instance summary view and choose the Networking tab. Scroll down to the network interfaces and check the interface ID and click it to navigate to the network interfaces view.

Find the correct interface from the list and click the ID again to see the configuration view. Now, under actions, select Change security groups.
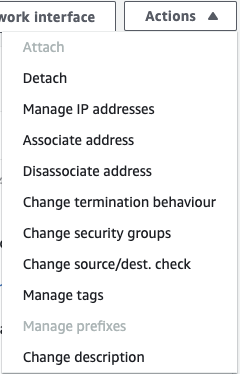
Now you can add the default security group.

Save the changes. Now the instances should be able to talk to each other.
Example: database security group
Now that your web servers are up and running you decide that you want to store data to a PostrgeSQL database. You want to minimize the attack surface to the server, so you decide to create a new security group just for the database.
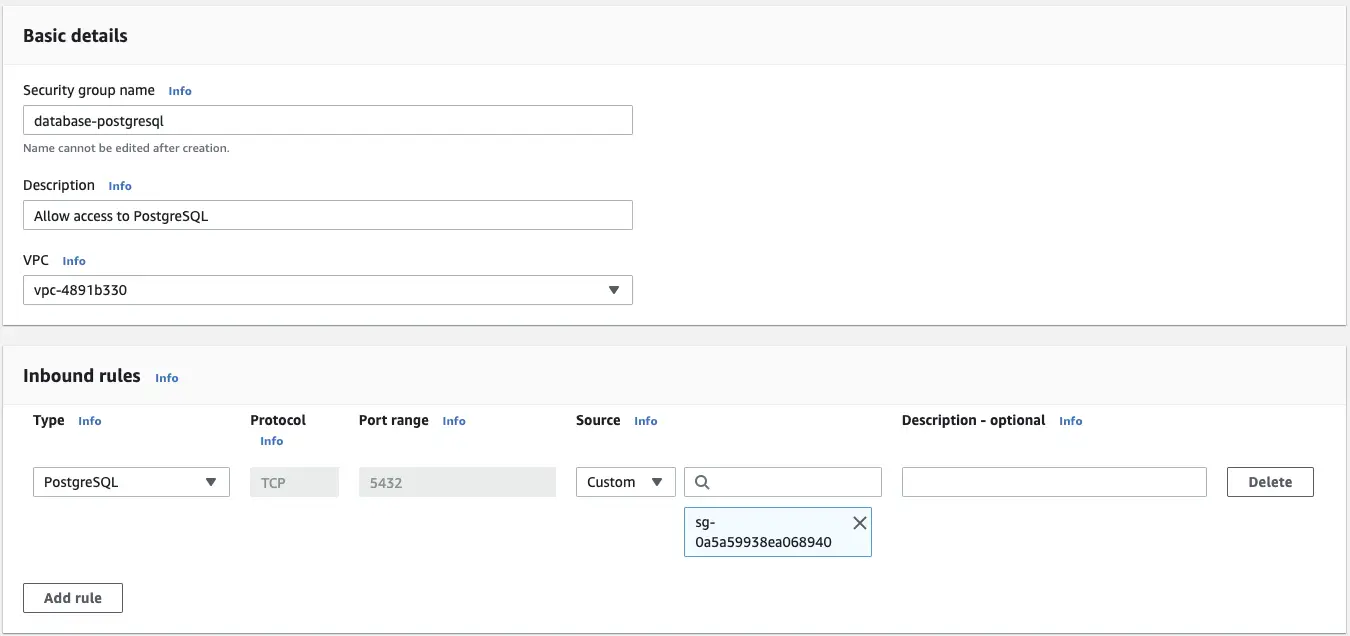
You don’t need to use the EC2 new instance wizard to create the security groups. Just navigate to Network & Security > Security Groups on the EC2 service and click the Create security group button.
The web servers can already send outbound connections everywhere through their existing security groups, so they don’t need any changes. However, the database server needs to allow incoming connections through the standard PostgreSQL port 5432. This rule type can be selected from the dropdown menu.
Now in the source configuration you need to select the web-server security group to apply the database access only to the web servers.
The database instance can now use this new group to selectively allow the incoming connections.
Conclusion
The rough architecture of the instances and security groups looks something like this.
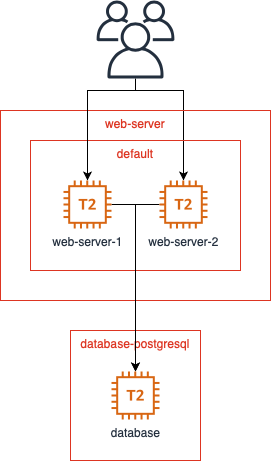
The database layer is not accessible to the general public but the web servers still have the needed access levels and nothing more. The default role allows the web servers to communicate with each other while the web-server role permits HTTP connections from the internet. The web servers are allowed to call the database since the web-server role is an allowed source for the database-postgresql group.
Note that this configuration does not use load balancers or network ACLs that you might want to use in a real application. It only demonstrates how the security groups play together.
If you’d like to see more explanations of things in AWS let me know about it on Twitter or through the contact form. Also, check out my newsletter if you wish to stay in the loop with occasional emails from me!
Previous post
Analytics Addiction is a ThingNext post
Markdown Kanban with Obsidian